As you've possibly noticed I haven't posted for a couple of months, this is due to being very busy followed by general apathy!
With unseasonal mildness until two weeks ago we've not needed the woodburners on, but with the cold snap they've been working hard keeping us warm. It's so much more satisfying sitting around a flickering fire, than huddling around a radiator! plus there is always the opportunity for roasting chestnuts and cooking jacket potatoes (wrapped in tin foil) in the ashes.
With the first hard frosts we've been able to dig up some of the parsnips, always a joy in the dark days of winter. I find nothing more comforting than a bowl of curried parsnip soup and hunk of fresh baked bread after a dark day at work.
This month I'm on a hunt for a North African maize flat-bread recipe that tastes like the lovely bread I used to eat as a child in Tunisia. I've never found a recipe that quite lives up to my memories, though I've been ferreting out a few over the past couple of months and hopefully the holidays will give time to experiment.
Tuesday 20 December 2011
Monday 31 October 2011
Home Grown Chilli and Apple Jelly
This jelly is perfect for this time of year and stores up the sun ripened goodness of the apples and chillies for the cold winter days.
It's perfect served with cheese or cold meats, can be added to marinades for stir fried meats...even smother sausages with it before frying or baking them to give a spicy caramelized coating.
It can be as mild or as hot as you like, depending on the type of chili you've grown and the number you put in.
Chili and apple jelly.
4-5 pounds of prepared windfall apples (i.e the bad bits cut off and the good bits roughly quartered)
8 chillies chopped (I use 8 medium hot chillies but if you use mild chillies you will get a mild jelly and hot chillies will give a hot jelly) (you will need an extra 6 chillies later on)
1litre of water
Put the above ingredients in either a slow cooker or a big jam pan and cover. simmer this until the apple is totally mushy.
Strain this pulp through a jelly bag for a few hours or overnight
Measure the strained liquid.
For every pint of liquid you will need 1/2 pound of sugar
Add the sugar and the liquid to a clean jam pan and place over a low heat, stir thoroughly and leave till the sugar is totally dissolved
Prepare six chillies by removing the green top and cleaning the seeds from the insides. Make sure you wear rubber gloves for this. Then very thinly slice the chillies.
Increase the heat under the jam pan and boil rapidly until setting point is reached.
Remove from the heat and add the sliced chillies. stir in well and ladle into sterilised jars. firmly put on sterilised lids
Boiling water bottle for 10 mins.
Label and enjoy
Sunday 30 October 2011
Home Grown Dried Pears
This is an easy way to store pears and the dried slices make a great healthy snack or can be chopped and added to cakes and muffins as an alternative to sultanas or raisins.
You'll need two roomy bowls and either a food dehydrator or a load of oven trays lined with greaseproof paper.
Half fill one of the bowls with water and juice of half a lemon
Half fill the other bowl with hot water and the juice of the other half of the lemon and a couple of teaspoons of honey.
Using a peeler or a sharp knife skin each pear and as soon as you are finished peeling each one pop it in the bowl with water and lemon juice.
When you can't put any more in that bowl take out a pear and thinly slice it, dropping the slices into the bowl with water and lemon and honey in it.
Once all your pears are sliced arrange them on the dehydrators trays, or your oven trays, so that each slice has a little space around it.
Place the oven trays in a very low oven (60 C) and check infrequently till they are leathery
Stack the dehydrator trays on the dehydrator base and turn on at a low heat.
When the pears are dry and leathery they can be stored in an airtight jar
Sunday 23 October 2011
Home Grown Apfel Streudel
Whenever my family were having a get together my grandmothers would always serve up this pudding, usually with cream or custard. Both grandmothers had slightly different versions and so this is a hybrid between the two. The pasty is the tricky part as it must be stretched as thinly as possible to give a light and crispy surround to the apple insides.
This makes a pretty large dish so will provide pudding for a couple of days or a large family get together.
Apfel Streudel
You will need a large baking tray for this
Oven heated to 220 C
This makes a pretty large dish so will provide pudding for a couple of days or a large family get together.
Apfel Streudel
You will need a large baking tray for this
Oven heated to 220 C
Dough
½ lb plain flour
1oz lard
1oz margarine
1/2 cup warm milk (ish)
pinch of salt
1 egg (standard size)
Filling
3-4lb apples
cup ½ breadcrumbs
several tbs of sugar and honey (depending on tastes and how sour your apples are)
cup raisins
1oz lard/butter melted
1 ½tsp cinnamon
Method
Tip flour into a heap onto a clean work-surface. (you can use a roomy bowl instead)
Chop the lard and margarine into the flour.
Make a well in the centre, and pour in the egg and milk
Mix by hand until a soft dough is formed.
Knead with the ball of the hand until smooth.
Leave in a warm place for about half an hour to rest.
Put dough on a floured tablecloth and stretch with a rolling pin and then pull gently with your hands until as thin as paper, try not to tare it at any point.
Brush with melted lard or butter, and sprinkle over the breadcrumbs and cinnamon.
thinly slice your apples and put a thin layer of the apples over the pastry, leaving a gap around the edges of the pasty. sprinkle over the apples some of the sugar and honey and the raisins. layer more apple slices over the raisins and sugar and repeat until all your apples are used up.
Gather tablecloth at edges of pastry and gradually roll up strudel, turning edges as you go. Place in a large baking tray and form into a crescent.
Bake at 220º C for about 25 mins.
Monday 17 October 2011
Home grown pepper jam
This is a lovely jam with a tiny touch of heat to have with cold meat and cheese. A great way of cooking up the good crop of sweet peppers we've had this year with the extra long growing season.
refrigerate after the seal is broken and eat within a couple of weeks.
Pepper Jam
1kg sweet peppers (for the prettiest looking jam use red or nearly red peppers)
400g sugar
1 chilli pepper (obviously if you don't like things spicy miss this out, or if you like it extra spicy add a couple more)
salt
Remember to wear rubber gloves if you are handling the chilli peppers.
Wash and clean the peppers, removing all the seeds from the inside.
Cut them in pieces and let them reduce with a sprinkle of salt, the chilli pepper and 6 tablespoons water in a non-stick pan at a low temperature.
As soon as the peppers are soft take the pan off the heat, and pass the peppers through a food mill (or rub them through a sieve).
Return the pepper mush to the pan and cook, while adding the sugar, until they are thickened.
Bottle in sterilised jars and seal, and either boiling water bath to store for a while or eat within a few months.refrigerate after the seal is broken and eat within a couple of weeks.
Thursday 6 October 2011
October
Having been thoroughly enjoying the sunshine and donning my summer frocks, i suspect for the last time, I've not been in the kitchen too much over the past couple of week to make more than the normal fare. However, last weekend, i was inspired by Chut Fest at Barrington Court, where anyone can go to trade their jams and chutneys. So expect a few preserves this month!
I'm besotted with my slow cooker at the moment. It's the perfect way to cook up anything that needs reducing down or simmering away for any length of time. It is such an easy way of cooking up a chicken carcass after Sunday lunch to make soup or a few lamb bones to make lamb stock.
It's been decided that we are going to have a totally local Christmas, getting all the food and presents that we can't make ourselves from the local area, shouldn't be too difficult as we don't have any teenagers to find gifts for!
Sunday 18 September 2011
Foraged Fungi Rice served with Local Rose Veal Schnitzels
Happiness in early autumn has always been a long walk with good company on a sunny day, munching on blackberries and the occasional plum as we talk about nothing in particular. Finding the occasional Chanterelle, Cep or field mushroom along the way to pop into a backpack.
Perfect specimens of young Ceps should be dipped in egg and then fine breadcrumbs and fried in a light oil. Not the healthiest of dishes but very tasty and you will have burned off plenty of calories finding the fungi earlier in the day.
Mostly, however, they are larger, older fungi when they are found, and Chanterelles are often so scarce as to only find a tiny handful, so adding them to rice is the perfect solution.
Schnitzels are a simple Austrian dish and can be made with Rose Veal, pork fillet or turkey breast.It uses bread crumbs so you can use up any bread that has gone stale, Simply break it up into smaller pieces and using the blunt end of a rolling pin pound it away to crumbs and roughly sieve it so you have fine crumbs. Great way to get rid of pent up aggression too!
For the Rice
A tablespoon of light oil
A small onion (or half a medium sized one) diced
selection of fungi also diced (you'll only need a handful or two of fungi)
Uncooked Rice (enough for the number of people you are feeding)
Fry the diced onion in oil in a large frying pan that you have a lid for.
When the onion is glossy and translucent add the fungi and fry until they are well sweated and about half the size.
Turn down the heat and add the rice and enough boiling water to cook it in. Stir once.
Cover and cook on low heat until the rice is ready.
Serve.
Rose Veal Schnitzels
Rose Veal Escalope (Westons Farm in Bampton sell fabulous quality veal) you can use turkey breast or pork fillet
plain flour
2 eggs, well beaten
breadcrumbs.
Light oil for shallow frying
Find 3 shallow but roomy plastic boxes or metal trays. one each for the flour, eggs and breadcrumbs.
Firstly you need to beat your meat. Place it on a thick chopping board and beat it either with the blunt end of rolling pin or a proper meat beating mallet. don't do it too much so that you end up with holes in it, but it does need to be quite thin so it cooks quickly.
Take your first piece of beaten meat. drop it into the tray of flour and shake the tray back and forth till it's well coated with flour.
Take your meat out of the flour tray and drop it in the egg tray. using a fork, turn the meat over so that both sides are coated with egg. take meat out of egg using the fork and let the excess drip off, back into the eggy tray.
Now drop your meat into the breadcrumb tray and shake well so it's thoroughly coated. put on a plate till you are ready to cook it and repeat the process with each piece of meat.
Heat up a frying pan with about 1cm of light oil.
Cook your Schnitzels in batches, frying one side then the other till your schnitzel is golden brown. Put on a sheet of kitchen roll or napkin so the excess oil is absorbed into the paper. If you have lots of them to cook place the done ones in a warmed oven.
Once all are cooked, serve with rice, salad or green beans.
Tuesday 6 September 2011
Home Grown Upside down plum cake
Well the weather is awful and it certainly doesn't make you feel good. As a special treat to remind you of the fleeting summer this is the perfect cake to warm your heart up.
you will need:
20cm round cake tin, with a loose bottom, well greased.
Oven heated to 180 degrees C
For the syrup
30g soft butter
30g demerara sugar
2tbsp of jam
450g plums halved and stones removed
For the cake
100g soft butter
100g caster sugar
3 eggs
100g self raising flour
baking powder
1/2 tsp ground cinnamon
2tbsp milk if needed
Make the syrup by beating together the softened butter, demerara sugar and jam and spread this over the base of the cake tin.
arrange your plums over the syrup with the cut sides down.
To make the cake, mix butter and sugar till light and fluffy, add eggs a little at a time, beating well. sift in flour and half a teaspoon of baking powder, and the cinnamon, and fold in well. if it's a little stiff add the milk.
spoon over the plums and level. bake in the oven for 40-50 mins, checking after about 28mins, when ready the cake will be well risen and golden. press lightly with finger to see if it bounces back to make sure it's ready.
Allow to cool and loosen the edges, turn over and serve on it's own, with cream or yogurt, or on a cold day...with hot custard.
Sunday 4 September 2011
September 2011
Well September has hit with a flurry of preserving. We have invested in a slow cooker to render down all the excess fruit so we can bottle it as is and make jam and other things at more leisurely times of year. Things have been too hectic to do more than that.
Forage wise the blackberries are ripening slowly, the elderberries are out, the sloes are coming on nicely and rosehips are ready. Fungi are springing up around us, Devil's Boletus (poisonous) always arrives earlier than the main crop of Boletus Edulis (good to eat) so as the Devil's Boletus are up already....next weekend may be a good time to forage. Field Mushrooms are about and lovely if you get to them before the grubs.
The gardens are still providing nicely, hopefully our butternut squashes and aubergines will be ripe before the weather turns! The little pumpkins we've been growing are doing really well, and we've already had a few roasted with sunday lunch. They are a perfect size to be used without leaving waste and have thin skins so after a scrub they can be cooked and skin and all can be eaten. This certainly cuts down the preparation time.
I think our careful planning and good use of freezer space and preserving jars will keep us from resorting to imported veg again this winter, even with the less than ideal growing conditions. We have sorted out a hopefully frost free space for the squashes and pumpkins as last year they got frozen and the results were...well...mushy and difficult to clean up!
Apple storage space that is free from mice or birds is proving difficult though. It's all very well wrapping the apples in nettle leaves and tucking them in for winter, but if they become winter stores for our little furry neighbours.....perhaps an extention to the pantry might get planning permission?
Another exciting but not food related happening is the possible arriving of Solar Panels this month. Another major step towards self sufficiency.
Wednesday 31 August 2011
Foraged Fungi
Firstly, if you are going to forage for mushrooms and fungi, go with someone who knows what they are doing, there are some fungi that are deadly poisonous, and many that will make you quite ill, and quite a few that quite simply taste revolting, so someone with knowledge will make the whole experience far more pleasant. Somerset Wildlife are running a couple of foraging courses if you are interested.
This, in my opinion, is the best and only way of cooking fresh wild fungi.
You will need, per person:
A slice of toast
Butter
A good two handfuls of fungi (Ceps or Chanterelles), cleaned and sliced
A slice of locally cured Bacon, cut thinly into strips
Some Garlic, chopped
A few sprigs of parsley
One fresh egg.
In a roomy frying pan, melt the butter and start to fry the bacon and garlic, put in the sliced mushrooms and keep stirring so they don't stick till they have sweated out plenty of water. sprinkle over the finely chopped parsley and allow to reduce on a lower heat while you cook the egg.
Fry the egg in your favourite way in a separate frying pan
Spoon the cooked fungi and juices over the buttered toast and place your egg on top.
Enjoy while hot.
Whenever my dad and I go mushrooming, this is the treat we cook when we come home from a successful forage. It's simple and wonderful.
Tuesday 23 August 2011
Foraged or Home Grown Fruit Cheeses
It's a fruity time of year, with plums, blackberries, raspberries, blueberries, pears and peaches all coming into ripeness.
I'm not keen on endlessly fishing pips and stones out of the jam pan, or eating jams with thousands of little seeds and pips in so tend to make lots of jellies instead, though the remaining pulp always leaves lots of guilt for not using natures bounty to its fullest.
Cheeses are a lovely way to use up the majority of the left over pulp and are ideal for using up over ripe plums that will spoil the setting of jam. A fruit cheese is a solid jelly like mass that can be sliced and eaten with cheese, sliced and eaten on it's own on biscuits, poured into shaped moulds and drenched in icing sugar and eaten as a sweety, sliced into little cubes and drenched in chocolate.....anyway, onto the recipe
Fruit Cheese
Place ripe fruit into a slow cooker with some water (or a large thick bottomed pan on a lowish heat, still adding the water)
Cook slowly until the fruit is mushy.
If you are making jelly place all the pulp into a jelly bag and allow to drip overnight....make jelly with the liquid.
For the cheese take the pulp left in the jelly bag(or all the pulp if you didn't make jelly) and rub it through a sieve into a thick bottomed pan. The skins and pips will be left to put into the compost.
Add honey or sugar to taste and heat slowly, while stirring, till all the sugar is dissolved.
Now simmer away slowly, stirring occasionally so it doesn't stick to the bottom of pan, until it's thickened so much you can see the bottom of the pan easily when you scrape through it with a wooden spoon.
Pour into:
A) containers that have been lined with greaseproof paper and allow to cool before turning out.
B) jars, then seal with a lid or cellophane circles made for jam making, these should be clearly labeled and will keep for up to a year
C) flexible moulds, something like silicone chocolate moulds, allow to cool before turning them out.
Saturday 20 August 2011
Home grown tomato tips
This is less of an actual recipe list more of a handful of ideas of dealing with lots of ripe tomatoes, as this has been a bit of a bumper year.
One of the simplest ways to serve fresh yummy tomatoes is this:
Thinly slice some large ripe tomatoes and arrange on a dish, sprinkle with finely chopped or mashed garlic and basil, drizzle with your favourite vinegar, I love balsamic at the moment, and finally drizzle with some tasty oil like olive or hemp. This will keep in the fridge for a couple of days, but best eaten quickly with mixed salad and locally cured hams.
Another easy way of getting through the crop and adding to the winter stores is to freeze or bottle the reduced tomato pulp, the simplest way is to pile a load of chopped ripe tomatoes (you can add herbs, chillies, courgettes....) into a slow cooker, cook covering it till it's mushed down and then take off the lid so it can simmer away quietly till it's nicely reduced. Then strain with a sieve, and work the rest of the mush through the sieve with a wooden spoon, till you are only left with the skins and pips, put the skins and pips on the compost heap and bag up the strained pulp and freeze! Ready for winter stews and soups, curries and all sorts.
Bottled tomatoes are also very useful for cooking throughout the winter and tomato-less spring, a lot of the modern tomato varieties have lower acid content than their forbears so a little citric acid or lemon juice is added.
Method:
boil some water in a saucepan and dunk your tomatoes, using a slatted spoon, for around 60 seconds and then dunk in a jug full of cold water, the skins should slip off.
core the skinned tomatoes and place in a sterilised pint preserving jar. Add a pinch, around 1/8 teaspoon of citric acid per pint jar, or 1/2 teaspoon of lemon juice. You can also add 1/4 teaspoon of salt but it isn't necessary.
Fill the jar to 1/2 of an inch from the rim with boiling water. wipe carefully around the top of the jar.
Put on your sterilised lid and place in a boiling water bath for 40 mins.
Remove from boiling water bath and allow to cool before labeling and storing in a cool dry place.
Thursday 4 August 2011
August 2011
Well we are in the 8th month and the gluts have arrived. Runner Beans, French Beans, courgettes, pumpkins, plums, tomatoes (both ripe and green), early main crop potatoes....the list goes on. From the productive veg patch or allotment there is far too much to eat fresh, and neighbours are treating fresh foodie gifts as a burden rather than a delight.
This is truly the time of the year when the preserving pans come into their own....and the growing stash of jam jars...and the spare chest freezers....but well used these will give you a fabulous selection of meals and treats all winter long! Plus foodie Christmas gifts to family and neighbours when such things are better received.
Our veg plot is run like a military operation at this time of year....allowing the runners to get woody is such a crime, as it's hardly worth bottling or freezing them when they won't taste very nice. Daily pickings, blanchings and freezings of all the bean varieties means we'll have enough to have with dinner and then a couple of bags to freeze. (and it doesn't mean long nights of preserving things)
Blanching (briefly boiling) the beans helps to preserve the vitamins so you will be able to keep the nutritional values as well as the taste in good condition.
The Taunton Flower Show is at the beginning of this month so it's a great opportunity to check out some new ideas and start the plans for next years garden....
Below is a link to an article in The Ecologist called the beginners guide to late summer foraging:
http://www.theecologist.org/green_green_living/food_and_drink/1000281/the_beginners_guide_to_late_summer_foraging.html
As always, be very sure of what you've got before eating it! Plants can be poisonous.
Sunday 24 July 2011
Home Grown Courgette Antipasto Slices
This is a great recipe when you have a spare afternoon to spend in the kitchen and lots of medium sized courgettes, as it can be made in bulk and bottled. But it's a great lunch time dish or addition to a summer salad if you only want to make a small amount, and can be easily made the day before so it can soak up the flavour of the basil and garlic.
It has a lovely smoky flavour and it one of the nices ways of cooking courgettes.
Courgette Antipasto Slices
1 medium sized Courgette per person
Balsamic Vinegar (or similar)
Olive Oil (or similar)
Garlic (you choose how many cloves!)
a few sprigs of Basil
Slice the Courgettes lengthways, about half a centimeter thick.
Using a griddle pan and a little oil cook the courgettes in batches until begining to smoke. They will end up with attractive griddle marks on them (dark brown rather than crispy black though)
Arrange on a dish, layering with torn basil and Garlic. drizzle with olive oil and balsamic vinigar. leave to soak up the juices and develop flavour for at least an hour.
Monday 11 July 2011
Home Grown Vegetable Crisps
This is a very naughty but very nice recipe. It's just the absolute basic version but you can add extra spiciness with chili flakes, pepper or herbs.
I used a special slicing gadget to get even slices, it's name currently escapes me....
You can use any oil, pick one that you like the flavour of, i prefer sunflower oil, which is produced in the UK.
I used a special slicing gadget to get even slices, it's name currently escapes me....
You can use any oil, pick one that you like the flavour of, i prefer sunflower oil, which is produced in the UK.
Vegetable Crisps
Ingredients
Any or all of the below can be used:
medium sized raw beetroot
sweet potatoes
Carrots
Potatoes
Parsnips
Oil, for deep-frying
Sea salt
Method
Peel the vegetables, then slice thinly, either by hand or using the slicing blade of a food processor.
Sprinkle with salt and dry well on kitchen paper.
Heat the oil to 180C or until a slice of vegetable added to it rises to the surface instantly and starts to brown.
Add vegetable slices in batches and fry until crisp and golden. Serve piled up on a plate and sprinkled with sea salt.
Home Grown Marrow and Lemon Jam
As promised here is the first of the courgette recipes. Over grown courgettes are ideal for this recipe, which uses the flesh's ability to absorb flavours perfectly. The soak over night will result in the little cubes of marrow expressing large amounts of water as they take in the sugar, so no water needs to be added.
This is a lovely sweet but tart jam, it only sets lightly, but it keeps well and tastes great in jam tarts, cakes, and on scones. In the big print i tend to label it without mentioning the word marrow, instead using the variety of courgette that it comes from! Lemon and Little Gem Jam looks so much more appetising i think!
This is a lovely sweet but tart jam, it only sets lightly, but it keeps well and tastes great in jam tarts, cakes, and on scones. In the big print i tend to label it without mentioning the word marrow, instead using the variety of courgette that it comes from! Lemon and Little Gem Jam looks so much more appetising i think!
MARROW AND LEMON JAM
2lb. Marrow (weight after preparation)
5 lemons
1½lb. Sugar
1½ pints water
½oz. Ginger root.
Peel the marrow, remove the seeds and cut the flesh into dice. Put into a basin, sprinkle with the sugar and allow to stand overnight.
Cut the lemons in half, squeeze out the juice and slice the peel and pith thinly. Put the juice, shredded peel and water into a saucepan and boil slowly for about 1¼hours, until the contents have reduced considerably, then strain: the extract should measure about half a pint.
Put the lemon extract and the prepared marrow and sugar, into a saucepan, add the root ginger and lemon pulp, tied in a piece of muslin, bring to the boil and boil slowly for about 1½hours, or until the marrow is clear and it's reached jamming temperature on the jam thermometer. Remove the ginger and, wearing rubber gloves, squeeze the muslin bag to express the juice. Pour into warm pots and cover immediately in the usual way.
This will make about 3 pounds of jam.
Sunday 3 July 2011
July 2011
Well it's that time of year again.....the Courgettes are beginning to arrive in numbers...it started in late June, with the excitement of the first one, and then the second, small and perfectly formed...but now they are ripening thick and fast, far faster than we can eat...so i may be adding a few marrow, easily substituted for giant courgettes, recipes this month. My personal favourite is marrow and ginger jam.
The broad beans are coming into their own too, though the runner beans seem late this year. Peas and Mange Tout are still coming, as are the carrots, new potatoes, salad leaves, hearting lettuces, strawberries, black currants, spring onions, and the beginnings of the salad beetroots. I'm sure I've missed many things off that list!
I've started adding foody foraging to many of my excursions out, I head for the hills as often as i can for long distance wanderings, and I've been trying to pick up local produce at the place they are produced. It's a wonderful excuse for having a snoop around some beautiful Somerset farmyards and it's a great way of meeting some really interesting people.
My new toy for the month is a DK Rocket Stove, bought at the Blackdown Woodland Festival. I haven't quite got it working yet...but I've only had a chance to play with it once. I aspire to being a good bushcrafter and that seems to be the ideal cooking implement. Once i have it working well, I have a lovely yogurt and honey flat bread recipe to try out on it...
Tuesday 28 June 2011
Home Preserved Pickled Garlic
For the first time in many years we have achieved a decent quantity and quality of garlic!
We bought the garlic bulbs at the Chutney Festival at Barrington Court last year, from a local farmer who has grown them for years, even supplying River Cottage.
No matter what we always end up with a few garlic bulbs that won't keep, not that there is anything too wrong with them, just not nice enough to keep all winter long, so instead of trying to use 5 garlic bulbs up in a couple of weeks I pickle them. They are best put into smaller preserving pots as you never get huge amounts...and you don't really want to eat your way through a large jar full when you open it as you will get objections from your friends.
This is a recipe i first tried last time we had a big crop...about 5 years ago. It's adapted from a book called "The Food Lover's Guide To Canning" by Rich and Crawford, 'canning' being the American term for 'bottling'. It's a must if you want to bottle soups, fruits and vegetables as it takes you through both boiling water bottling and pressure bottling so your produce will keep for longer.
I always use one or the other method as it really does mean the produce will keep well, and it stays perfect without any shrinkage or spoilage for many months.
Pickled Garlic
8 oz of garlic cloves, pealed and the rough bit at the end cut off
a sprig of fresh thyme
a sprig of fresh rosemary
4 crushed peppercorns
1/2 cup white wine vinegar(or just white vinegar)
1/2 cup of mead, or white wine
1 dried chili pepper, of the hotness you prefer, de seeded and sliced
1 tbs of honey
1 tsp of sea salt
Put the thyme, rosemary and peppercorns in a muslin bag and tie up the bag. Put it in a smallish saucepan and add the prepared garlic cloves, vinegar, mead, chili pepper, honey and salt.
Cover and bring to the boil, boiling for only five minutes. place somewhere to cool, keeping it covered.
Prepare your preserving jars by washing out the glass jar and placing into an oven heated to 80 degrees C. place the lids in a saucepan of boiling water.
If you are going to have a boiling water bath to preserve the jars, get this, and all your preserving bits ready.
The boiling water bath needs to be hot (82 degrees C) when you place the hot jars into it.
Now you have everything ready, put the saucepan with the garlic in back onto the hob and boil again, for another five minutes.
Remove the muslin bag from the saucepan.
Ladle into the hot jars leaving 1/2 an inch between the top of the garlic and it's juices, and the top of the jar. Make sure the rim of the jar is very clean. Screw on dried, but still hot, lid.
If you aren't going to boiling water process the garlic, place all the hot jars together and wrap tea towels around them, so they cool down slowly, this will seal them but they need to be eaten within a few months.
If you are going to boiling water process them, put them into the boiling water bath for 20 minutes. After the 20 minutes are up, remove them from the water and leave to cool.
Please use sensible precautions when using boiling water!
If you intend to boiling water or pressure process your preserves there are loads of very good American books out there, please read one of them before doing any pressure processing!
Wednesday 22 June 2011
Home Grown New Potato Salad
There is plenty coming in from the garden at the moment, mangetout and sugar snap peas, plus the traditional garden pea(though these don't often get cooked, they are just lovely to pod and eat as they are. We've even had the first boiling of broad beans. Some people are already getting courgettes in, though ours are far too tiny to eat.
One garden product that has surpassed everything else this year is the humble potato. We grew Lady Crystal and Charlottes this year and they are abundant and very tasty, helped by the dry weather keeping off the blight I think.
This is my mother's recipe for potato salad, it's a great way of using up new potatoes if you have a heavy crop as you simply boil up double the amount for a big dinner, leave half to cool and they become your potato salad for the next day.
Ingredients:
1lb of new potatoes, boiled until firm but not mushy
1 pickled gherkin, or if you don't like pickled things about 1/4 of a cucumber.
3 medium sized spring onions
2 tbs of mayonaise of choice
Chop up the potatoes into 1 cm cubes
Cut up the gherkin into little chunks about 0.5cm
Slice the spring onions into small rings
Put all the ingredients into a bowl and mix thouroughly, add more mayo if there isn't enough
Dust with paprika to make it look pretty and serve.
perfect with schnitzels and garden salad
One garden product that has surpassed everything else this year is the humble potato. We grew Lady Crystal and Charlottes this year and they are abundant and very tasty, helped by the dry weather keeping off the blight I think.
This is my mother's recipe for potato salad, it's a great way of using up new potatoes if you have a heavy crop as you simply boil up double the amount for a big dinner, leave half to cool and they become your potato salad for the next day.
 |
| Potato Salad mostly made from garden produce |
Ingredients:
1lb of new potatoes, boiled until firm but not mushy
1 pickled gherkin, or if you don't like pickled things about 1/4 of a cucumber.
3 medium sized spring onions
2 tbs of mayonaise of choice
Chop up the potatoes into 1 cm cubes
Cut up the gherkin into little chunks about 0.5cm
Slice the spring onions into small rings
Put all the ingredients into a bowl and mix thouroughly, add more mayo if there isn't enough
Dust with paprika to make it look pretty and serve.
perfect with schnitzels and garden salad
Tuesday 7 June 2011
Foraged Wild Strawberry and Wheat Free Shortbread
Unusually there seems to be an abundance of wild and alpine strawberries this year. There is a bumper crop of the bigger cultivated ones, but for an intense burst of stawberry flavour you can't beat the tiny wild ones.
Usually we leave these jewel like berries for the birds and mice to devour but as there is so many of them we feel a little less guilty about having a handful for our pudding.
Usually we leave these jewel like berries for the birds and mice to devour but as there is so many of them we feel a little less guilty about having a handful for our pudding.
 | ||
| Alpine Strawberry |
For the Shortbread:
Shortbread (Wheatfree)
2 oz Rice flour
2 oz Potato flour
2 oz sizzed oats (break down size of oats in processor)
4 oz butter
2 oz Demerara sugar
After you have sizzed your oats, place all other ingredients into processor. Once the mixture comes together, put into cake tin with a removerable base, making sure all sides and bottom are greased first so the shortbread doesn't stick to the sides.
Cook for 40 minutes at 150 degrees C.
Once baking is complete, slide out base of cake tin, then cut shortbread into a wheel of six and then leave to cool still on the base.
This Shortbread is a lovely melting moment with a handful of strawberries and cream, or yogurt
Recipe provided by Maria
June 2011
We are already a week into June!
The spring has been so dry I think gardening time is spent mostly in watering, though it has highlighted the benefits of a good number of water butts and simple irrigation systems.
The new potatoes are coming in thick and fast, the dry spring has at least kept the blight at bay for the moment.
Herbs are also growing well, with watering. Something we started doing last year was chopping herbs when they were at their best and freezing them in little pots or ice cube trays. They were a great bonus for soups and stews during the winter months as they add so much better flavour than dried herbs.
One handy trick to help keep plants safe from pests and add a bit of extra fertilizer is to surround plants like melons, courgettes and cucumbers with sheep's wool, most people with a small flock will happily sell you a fleece, you may even get one for nothing if it's poor quality and matted up. There is no need to wash it. simply surround the plants. I've even tried this around the base of young trees to keep the grass down for a bit. The birds love it as they can steal some to line their nests.
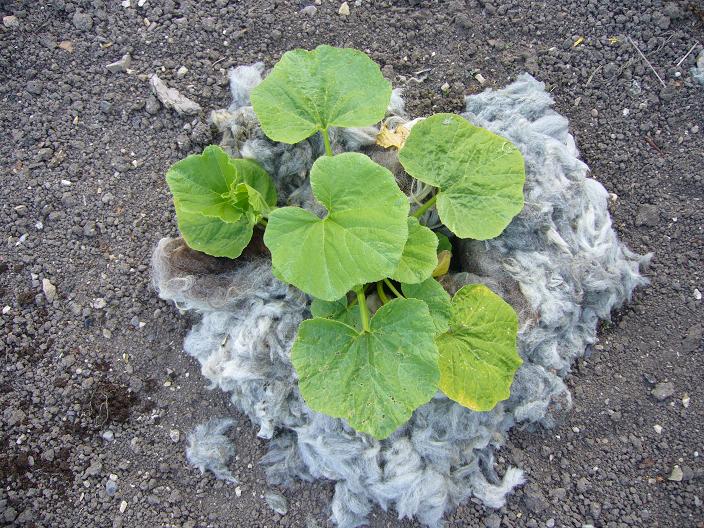 |
| Courgette plant all tucked up in fleece blanket |
Sunday 22 May 2011
Local Bacon Wrapped Chicken
The advantages of buying local meat and veg, even when you can't grow your own, are many. From keeping local businesses flourishing to really knowing what goes into the food on your plate, from guaranteeing freshness to greater animal welfare.
So, shop around and see what your local area has to offer.
This is a simple and tasty way of cooking chicken breast, best served with a fresh spring salad straight from the garden.
Ingredients:
One chicken breast per person
One slice of bacon per person
Cheese (of your choice, i like Cheddar)
Cooking Oil (variety of your choice)
Cut the cheese into thickish slices. Place one slice of cheese on each chicken breast, wrap the bacon around the chicken breast, covering the piece of cheese.
Heat the oil in a frying pan and seal the chicken, on all sides (you don't need to be too fussy, it's just to bring out the flavour of the bacon and chicken)
Place the chicken pieces into a backing dish and cover with a lid.
Bake in the oven for about 20mins, until chicken is cooked through.
Serve on a fresh salad and drizzle with the cooking juices.
So, shop around and see what your local area has to offer.
This is a simple and tasty way of cooking chicken breast, best served with a fresh spring salad straight from the garden.
Ingredients:
One chicken breast per person
One slice of bacon per person
Cheese (of your choice, i like Cheddar)
Cooking Oil (variety of your choice)
 |
| Ready to Cook |
Cut the cheese into thickish slices. Place one slice of cheese on each chicken breast, wrap the bacon around the chicken breast, covering the piece of cheese.
Heat the oil in a frying pan and seal the chicken, on all sides (you don't need to be too fussy, it's just to bring out the flavour of the bacon and chicken)
Place the chicken pieces into a backing dish and cover with a lid.
Bake in the oven for about 20mins, until chicken is cooked through.
Serve on a fresh salad and drizzle with the cooking juices.
 | |
| Bacon Wrapped Chicken with Garden Salad and New Potatoes |
Wednesday 18 May 2011
Foraged Elderflower Pancakes
There are always a few food items to forage for at any time of year.
Make sure you are very sure of what you are picking when it comes to forage, there are plenty of books out there with clear pictures, but when in doubt ask someone who knows.
Also for anything you are picking which is low to the ground, make sure that it isn't where dogs can wee on it.
Currently in mid May the nettles haven't quite come in to flower so nettle soup can still be on the menu, make it with some bacon croutons sprinkled in it and it makes a great bug busting soup.
The Elder Trees are just coming in to flower and Elderflower Pancakes have always been a great favourite since I was a child. It's just a simple pancake, with elderflowers in it.
Elderflower Pancakes
Elderflowers make lovely cordial too, or jelly.
Make sure you are very sure of what you are picking when it comes to forage, there are plenty of books out there with clear pictures, but when in doubt ask someone who knows.
Also for anything you are picking which is low to the ground, make sure that it isn't where dogs can wee on it.
Currently in mid May the nettles haven't quite come in to flower so nettle soup can still be on the menu, make it with some bacon croutons sprinkled in it and it makes a great bug busting soup.
 |
| Elderflowers |
The Elder Trees are just coming in to flower and Elderflower Pancakes have always been a great favourite since I was a child. It's just a simple pancake, with elderflowers in it.
Elderflower Pancakes
Batter:
4 oz Flour
2 Eggs
1/2 pint Milk
a pinch of salt (optional)
2 Eggs
1/2 pint Milk
a pinch of salt (optional)
Mix all the ingredients up in a big bowl. Whisk until smooth
Leave in a cool place for about 1/2 an hour.
Pick one stalk of elderflowers per pancake you want to make.
wash the flowers and cut from the stems(you don't need to get rid of all the green, just the thick bits)
mix the flowers into the batter.
Heat some cooking oil in frying pan (ideally non stick) and ladle enough batter to coat the frying pan evenly but thinly.
Flip the pancake once.
Serve hot with cream, icecream, lemon juice or just on it's own.
 |
| A selection of eggs from our chickens |
Tuesday 17 May 2011
Home Grown Rhubarb Crumble
 | |
| Mixed Salad Leaves |
Asparagus is doing well this year with all the sunshine.
For me, there is nothing that brings in the joys of spring more than rhubarb crumble.
It isn't difficult or fussy, so i think it's ideal for my first recipe.
Rhubarb Crumble.
Ingredient:
Three fat stalks of rhubarb, leaf part cut off
3 or 4 tbs Honey, more if you like it sweet. or you can use sugar
6oz of Flour
3oz of Butter
3oz of Sugar
Wash rhubarb and chop into inch long bits, place in a deep oven proof dish.
Drizzle the honey over rhubarb.
In a separate bowl rub the butter into the flour until it looks like bread crumbs
mix in the sugar and spread the crumble mix over the rhubarb.
Cook in the centre of an oven heated to 180 C for about 40 mins.
You can use up any old, but not brown, apples or pears by peeling and chopping in with the rhubarb. Also crystalised ginger can add a bit of a zing.
Rhubarb can also be bottled so you can enjoy this pudding in mid winter if you so wish.
 |
| Forced Rhubarb Leaves |
Monday 16 May 2011
Hi, I'm Eleanor, based in Taunton, Somerset, UK.
The idea for this blog came from a Taunton Transition Town meeting. Talking about how to promote local and home grown produce.
A diet based on local food was sugested, a small group met up and the idea for this was born!
Essentially what we are trying to achieve is to promote local food in all it's forms. So we are hoping to have a list of things that are in season to forage, plant, harvest and buy. Plus what to preserve for winter and how to do it.
Also we will have recipes using all these lovely locally produced things. Please feel free to send me any of your favourite recipes, esspecially any that are child friendly.
Every month we'll have a little friendly competition, publishing some recipes to see how many of the ingredients you can source locally to you. Anyone can join in! Just see how low you can go(for food miles that is!)
Subscribe to:
Posts (Atom)